Category Archives: Art Quilts
From the Design Wall Part 1
This is the first of a series of posts showing how an art quilt goes from the design wall to a finished piece. I am writing these as I am making this piece, so there will be some posts before and after each post in this series. I would love to hear your thoughts on this as I go, so please let me know what you think in the comment section.
Starting out, I went into my stash of hand dyed fabric (I do this myself) and found this nice grey/blue length that seemed a good neutral background for the piece I have in mind. Then I started looking for color. I auditioned several colors and the photo above is what I started out with.
My usual process is to let an idea percolate for awhile, while I work on other things. The photo above shows another fabric I added into the mix. It seems to give it the little bit of pop I was looking for.
That little piece of white over there to the right are some very rough sketches of some of the shapes I want to incorporate into this piece. Here is a close up…
You see…very rough sketches. But they give me an idea of the direction I will go — I have ruled out some shapes and combinations and have kept some as more interesting. Keep in mind that these are a starting point. I may end up with something entirely different. The point of this process is to get the thinking/creativity started.
This will stay up on the design wall for a couple more days, as I continue to think about exactly how to translate my idea into fabric. Next step, I will start cutting and throwing the shapes up onto the design wall.
From “Fugly” to “Has Potential”
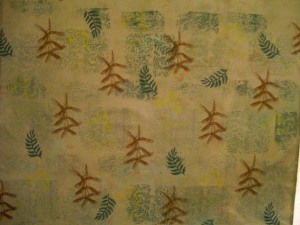
This piece was some of the fugliest fabric I have ever ever ever dyed. It was awful. I had dyed it a green that didn’t turn out nice and overdyed it in a brownish red that just muddied up the green until it looked…it just was fugly.
So while I am fooling around with surface design again, trying to get back into the swing of it, this seemed like a good piece to work with. It couldn’t get any worse!
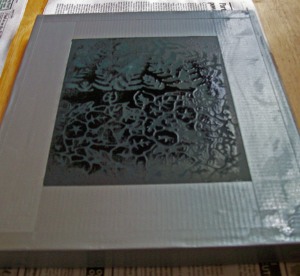
I started with deconstructed screen printing. This was a new-to-me technique that I now really like. The process is to mix up some print paste (urea, thickener, water) and add in some dye. Then create your screen — I used some plastic artist rubbing material, put it under the screen and pulled the dye paste over it. This created an imprint on the screen, which I then let dry overnight. This is what it looked like.
Then I put the screen on the fabric and pulled screen paste (print past with soda ash mixed in) across it. The first prints come out dark and clear, then fade and muddy up as you continue screening. So I was moving all over the fabric with the screen and just that first step was a huge improvement.
Then I went in with some thermofax screens and printed the maple seeds in brown, and some flowers in a golden yellow with thickened dye. I am not completely happy with how the flowers came out but that’s no big deal. And finally I went in with a leaf stamp and stamped it up with some green thickened dye.
When using these types of techniques, I would normally batch this by steaming. Since this was the only piece I was working on, I went ahead with a washout instead. The only problem I had with the washout was that some of the brown migrated. But that actually made the fabric a bit better!
I really enjoyed playing around with this. I don’t think anyone would say this fabric is beautiful. But it definitely has potential!
Extreme Makeover
This is a length of fabric that I painted a few years ago. (Please forgive the poor photography.)I have never used it for a couple of different reasons. First, even though I treated it with an industrial fabric softener, I have never really liked the hand of the fabric after painting. Second, I was painting two layers at a time, with this being the top layer. It’s just not that attractive. It’s ok, but the bottom layer is really much nicer.
Since I am starting to play around with surface design again, it seemed like a good time to drag this piece out and give it a makeover. So I laid it out on my kitchen table, as seen above, and started in. I screen printed, I stenciled, I screen printed more, and had a great time with it all. Because this was already painted, with no dye, all the surface design was done with fabric paint.
And this is what happened…
Much more interesting! Not exactly a work of art, but definitely more interesting. And most important, I had a lot of fun doing it!
Handcrafts and ebooks
So I landed a gig to write an ebook on “How to Quilt.” I have to say I am pretty excited about this! I have done a lot of writing over the years, but I have never written a “how to” type of book.
I really enjoy talking about quilting, knitting and all kinds of handcrafts. Of course, handcrafts are becoming more and more popular these days. It’s pretty cool to have the opportunity to share information about something I have been doing my whole life!
Angles and Lines
I haven’t made a lot of art quilts lately. My life has changed so much in the last two years — moving, divorcing, dating, layoffs at work, etc. Within that stress I have taken great comfort in knitting, spinning, some fashion sewing, traditional quilting, and even making some jewelry again. I have even taken some drawing classes and am starting to try my hand at designing fabric. All in all, still creative but not at the same level of intensity.
This piece, Angles and Lines, has been one of my favorites. It’s about three feet square. I dyed all of the fabric used in the quilt. It was an experiment in dyeing that creates a brushed cotton — it looks almost like suede. It was a very successful experiment and with the deep colors I used during that time it was even more dramatic. The result at least in part, was this piece.
 The entire piece using fusing for the construction. I cut the strips and fused them together first. Then I cut the large pieces, cut the strips to fit and fused them all together. The whole piece is fused to the batting. I use an envelope technique to add the backing on and then its ready to quilt. I straight line quilted this piece, to echo the lines in the fused strips and emphasize the angles of the large pieces.
I have shown this quilt in several different galleries around town. And I’m glad it has never sold. I really love this one!


